
June 13, 2022
Setting Up Taxes for Your WooCommerce Store: What You Need To Know

When you’re getting ready to open a WooCommerce store, there are a lot of things you need to manage to make sure things run smoothly. Managing an online store requires you to keep an eye on your inventory, product management, payment and shipping, and much more. But one of the most tedious tasks that many people tend to overlook is ensuring that their WooCommerce tax settings are correct.
There are many state and federal laws associated with sales tax collection and reporting, so it’s important to make sure that the process is completed correctly. To help ease the setup process, many businesses turn to web development companies for assistance. Working with your development agency alongside a tax professional can help you set up your store taxes so that they are completely accurate.
When it comes to setting up sales tax in your WooCommerce store, there are several things you’ll need to do. Continue reading below to learn more about each aspect of WooCommerce tax settings.
Define Sales Tax for Your Store
Sale taxes are a bit simpler to handle if you have a physical store because of the predefined location. However, sales tax may be difficult when it comes to an online shop since you have the option of shipping all around the world. The sales tax laws vary by state and region, making the task even more difficult. If you own several stores in different states, this can be a real headache.
You must charge and collect sales tax on items sold in states where you have a sales tax nexus. The term “nexus” refers to an establishment that emerges when you have a store in various locations and states. Let’s look at some examples of sales tax nexus, as well as how it affects how you pay sales tax.
- Economic
When you reach a specified sales level in a state, you may establish a sales tax nexus. This might be done based on the number of sales, transactions, or amounts. For example, if your store conducts 200 transactions or more per year in a particular state, you may be obligated to collect and pay sales tax for any orders shipped to locations in that state. - Home
One of the most frequent types of nexus, this necessitates you to report and pay sales tax in states where you have a physical presence/store. If you have an office, store, warehouse, or distribution center in another state, you’ve established a sales tax nexus in that state. - Employee
You may collect sales tax from customers in the state where your staff is working if you have an employee nexus. This is for businesses or multinational companies that hire people from all over the country. They must register and charge sales tax to each employee’s state. - Inventory
This is for companies that don’t have a physical presence in their home states or utilize external vendors. A sales tax nexus is generated in the state in which your inventory is kept.
Once you have determined where a sales tax nexus exists for your company, the next thing you need to do is register for a sales tax permit in that state. This permit will allow you to collect sales tax from customers and report it to the proper authorities.
Once your application for a sales tax permit has been approved, you can begin to collect sales tax on all applicable orders. As you continue to operate your WooCommerce store and collect sales tax, it’s important to be familiar with your state’s sales tax laws. This will allow you to ensure that you are in compliance and can avoid penalties for non-compliance.
How to Collect and File Taxes From eCommerce Sales
You must start paying and reporting WooCommerce sales taxes once you’ve determined the sales tax nexus and registered for a permit. Every state has its own rules regarding sales tax collection, which might be difficult when you have numerous nexuses.
As a result, it’s necessary to automate the tax process or employ the services of an expert to do so. The rates are classified into two categories: the store’s location and that of the buyer. Due to added complexity, separate rules may apply to business-to-business transactions.
You’ll need to submit WooCommerce sales tax returns after you’ve collected them. Each state has its own rules governing how sales tax must be paid, making this a very difficult and time-consuming task that can be overwhelming to a business owner. Some states expect you to physically send the payments, while others want them sent electronically. Taxes may be filed quarterly, monthly, or yearly depending on the circumstances, so it’s important to create a process to help you stay informed in case anything changes.
Configuring WooCommerce Sales Taxes
So how do you add sales tax in WooCommerce, or better yet, how does WooCommerce calculate tax? To put things simply, once you have enabled the tax rates option in the general settings, you can go to WooCommerce > Settings > Tax to further configure or import WooCommerce tax rates. WooCommerce is then able to calculate taxes using one of three different methods: store location, customers’ billing location, or customers’ shipping location.
WooCommerce also offers multiple options for your site such as if you want to add taxes with your price, shipping class, additional classes, and much more. You can also assign classes to your products, so when a customer buys a product, a standard or additional tax class is applied to it. You can also enable tax prices on your product page, in the checkout, or cart page. Looking for the easy button? You can skip manually setting and managing taxes and instead automate the taxes using these solutions listed below.
To ensure compliance with sales tax laws, it’s important to work with both an Atlanta eCommerce developer and a local accounting professional who can help you set up and manage your WooCommerce store. With the right tools and expertise, you can streamline the tax collection process so that you can focus on growing your business.
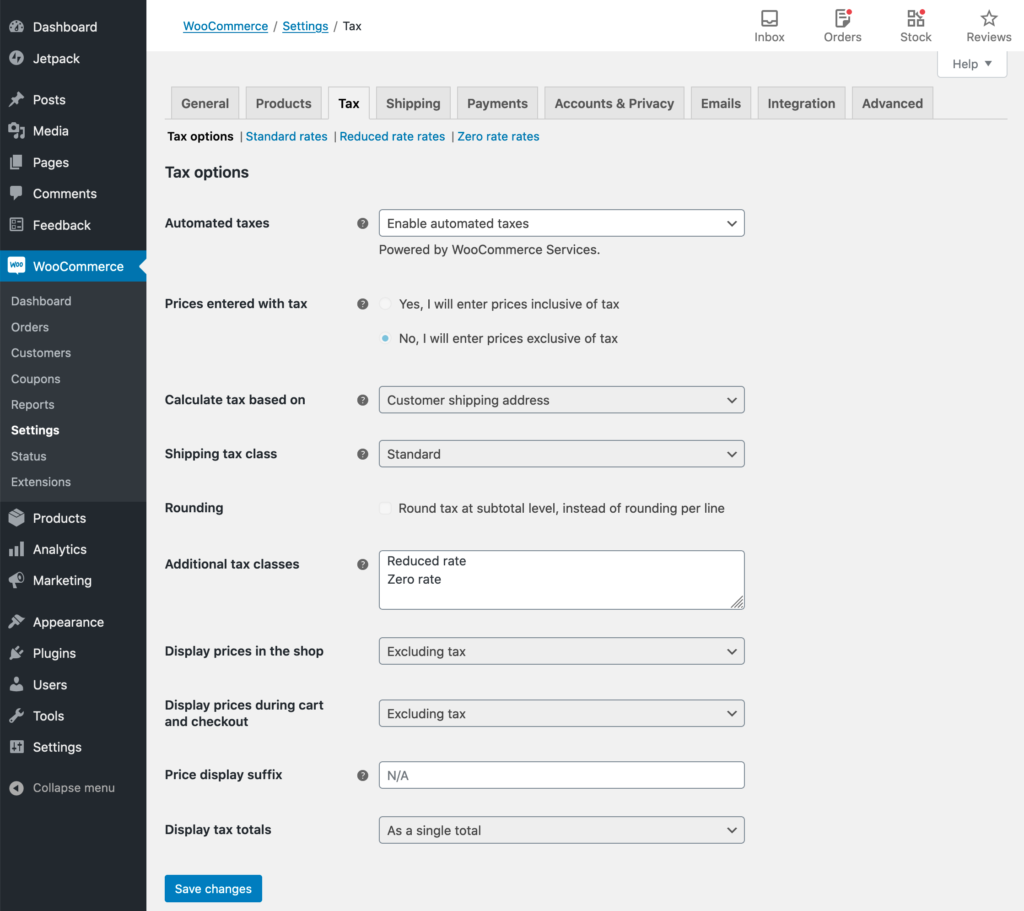
Available Tax Settings
There are many different tax settings that you can configure in your WooCommerce store. Let’s take a closer look at each of these below.
Prices entered with tax: First, you need to decide whether your product prices will include tax or not.
- Selecting the first option, Yes, I will enter prices inclusive of tax will allow you to calculate prices that include the store’s tax rate. For example, products purchased in a specific location will automatically include that location’s sales tax in the price the customer is shown on the product page.
- Selecting the second option, No, I will enter prices exclusive of tax means that the prices shown will not include tax. Tax will be calculated as an additional cost and supplied at checkout. For example, if you display a product for $10 in your store, its total cost will display as $13 (with a $3 tax fee) at checkout.
Calculate tax based on: The next option is a drop-down menu. It gives you three options for you to decide from such as which location you’ll use as a base to set up your tax form. You can choose from the customer shipping address, the customer billing address, or your shop’s base address.
Shipping tax class: Next you’ll need to define the shipping tax class. Typically, the shipping tax class is set in relation to the items in the cart. For example, if a customer adds a product to their cart that falls under a different tax rate, the respective shipping tax will get calculated at the same rate. ‘Shipping tax class based on cart items’ is the most common option, however, you can also choose an alternate shipping tax class such as standard, reduced rate, or zero rate from the drop-down menu to better fit your store’s needs.
Rounding: Now you’ll be asked about rounding. This setting is asking whether you’d like to round the taxes off to the nearest approximate digit on the subtotal or for each line item or product.
Additional tax classes: WooCommerce allows you to add your own rates in addition to the standard tax rates. That can be done in the Additional Tax Classes section. If you create a new tax class, it’ll display as a new option in the tax menu items.
Display prices in the shop: Here you can decide whether you want your product prices to display including or excluding the tax rate within the shop. Most US-based e-commerce websites do not include taxes within the shop catalog and product pages.
Display prices in the cart and during checkout: Similarly, you can decide whether you want your product prices to display including or excluding the tax rate within the shop. Again, most US-based e-commerce websites do not tack on taxes to the product price within the cart or checkout.
Price display suffix: If you’d like to add a suffix to the end of the product price, you can add it here. For example, you could add text along the lines of “inclusive of VAT” or similar.
Display tax totals: The final option lets you decide whether you’d like to display the final tax sum as a single total or as an itemized total. Selecting to display a single total will display the taxes due on the total of the products in the cart, whereas itemized will display the tax due for each item.
Tax Options
Once you’ve configured the tax options for your online store, it’s your responsibility to calculate and enter the correct tax rates for your store for each location you’re shipping to. This is done via the three tabs in the menu which are:
- Standard rates – allows you to set up different tax rates for your shop
- Reduced rate rates – allows you to set up tax rates for reduced rate items
- Zero rate rates – allows you to set up rates for tax-free items
If you have a global online store with tax rate variances between countries, you may want to use a standard rate and a reduced rate for complicated operations.
Standard Tax Rate
This section of the WooCommerce tax menu is blank by default. If you click “Insert row”, a table will display and you can then click on any of the cells to enter data. There are nine different cells to input the following attributes:
- Country Code: 2-digit country code for the rate.
- State Code: 2-digit state code for the rate.
- ZIP/Postcode: You can enter several values for the field, just separate them with a semicolon (;). Leave blank to apply all postcodes.
- City: Similar to Postcode, you can enter multiple cities separated by semi-colons (;). Leave blank (*) to apply to all cities.
- Rate Percent: Enter the tax rate, for example, 20.000 for a tax rate of 20%.
- Tax Name: Name your tax, e.g. VAT, Sales Tax.
- Priority: You can choose a priority for this tax rate. Only one matching rate per priority will be used. For defining multiple tax rates for the same area, you have to set a different priority for each rate.
- Compound Taxes: Tick this checkbox if you have an additional tax rate that is to be applied on top of all the other taxes.
- Shipping: If you want this tax to be applied to shipping charges then hit this checkbox too.
Automate the eCommerce Tax Process
Being an eCommerce platform, WooCommerce offers its users everything that they need to start their eCommerce business. But remember, neither it is an accounting platform nor does it offer any accounting feature. As you can see above, there are a lot of different variables and decisions to make surrounding sales tax. That adds up to a lot of work and has the potential to lead to multiple errors and even legal complications especially if things are not set up correctly or not properly updated from tax laws and rates constantly changing.
To help ease the strain of doing it all yourself, there are many WooCommerce sales tax plugins available that can automate the whole process including retrieving the latest tax rates. With this feature, every time you make a sale through WooCommerce, the appropriate tax amount for that sale is automatically calculated and applied to the invoice.
That means you don’t have to worry about checking the rates or doing calculations, which will save you time, money, and stress. It also leaves less room for error, so your business has a better chance of staying on top of sales tax compliance. We almost always recommend automating the taxes in WooCommerce to avoid the headaches of changing tax rates even if you only have one nexus.
WooCommerce Tax
This WordPress module is brought to you by Automattic, the team behind WordPress and it runs through their JetPack plugin. Unlike most automatic tax calculation plugins, WooCommerce Tax is completely free and works with dozens of countries including the US with state taxes. The only catch is it only works with one nexus so if you have multiple locations or warehouses, this is not an option, but for small businesses, it is a great free automated solution. It is powered by TaxJar, a well-known, reputable tax software company. Note you do not need to use the automated shipping to have JetPack power your automated taxes.
TaxJar for WooCommerce
Speaking of TaxJar, the company provides a free WordPress plugin assuming you sign up for their paid monthly service. For small and medium businesses, it provides similar capabilities as the above, but works across multiple nexuses, helps notify you if you are hitting the threshold in specific states by sales and need to apply for a business license and Taxjar will file your taxes on your behalf to each state/country supported for an additional fee.
WooCommerce AvaTax
If you have a more complex tax situation or a larger business, Avalara is one of the biggest tax compliance software companies out there that can handle those situations with ease. WooCommerce AvaTax is a WordPress plugin developed by SkyVerge, a well-known third-party WooCommerce development company. With their plugin, you get all the benefits of Avalara for even the most demanding tax situations.
Automating International Duties and Taxes
With the solutions above, some country or state taxes may be calculated, but they may not calculate the total ‘landed cost’ that your customer pays if you are shipping internationally. For example, we reached out to TaxJar and full VAT support was not yet there as of this writing. Avalara does support VAT, but it requires a large upfront cost commitment.
This means while you may be tax compliant in other countries, your customer may end up having to pay additional taxes or taxes locally once they pick up or receive their item(s) or you may end up needing to pay additional taxes later on. This can cause unnecessary chargebacks and lost revenue so you should consider something like Zonos in those situations. You can read more about the total landed cost in our guide.
Consult An Accounting Expert
If you have any questions about WooCommerce sales tax or how an accounting solution can help automate the process for you, we encourage you to reach out to a professional accounting expert. They will be more than happy to answer any questions you may have and help you find the best solution for your business.
Need Help With Your WooCommerce Store? Contact an Atlanta Web Developer
Whether you are just starting out with an eCommerce business or have been running one for a while, managing sales tax can be a complex and stressful process. If you are looking for an easy and effective way to automate the eCommerce tax process, consider contacting a team of Atlanta web developers to help you integrate a WooCommerce sales tax plugin. They can help you choose the right plugin for your business and ensure that it is properly installed and configured.
Don’t let the complexity of sales tax management prevent you from growing your eCommerce business and achieving your goals. Contact us today to learn more about everything from transactional and marketing emails to integrating a WooCommerce sales tax plugin into your store.

Matt Schwartz is an accomplished entrepreneur and technology expert based in Atlanta, Georgia. He is the founder and CEO of Inspry, a WordPress and WooCommerce web development and maintenance web agency that has been providing cutting-edge technology solutions to clients since 2011. With over a decade of experience in the industry, Matt has become a respected figure in the web development community and has helped numerous businesses achieve their digital goals.